
This is part three in a three part series on home automation with XBMC (or any HTPC really..). What we’re working towards is having your HTPC turn on when you walk in the door after work. We setup and enabled WOL (wake on lan) and found our MAC address in part 1, setup and configured remote launcher to send the WOL packet in part 2, and in this part we are setting up Llama on our Android device. Follow below to continue setting it all up.
If you’re joining us now on this setup, you may need to take a look at parts 1 and 2 first in order to get a better understanding
Home Automation – Getting Your HTPC To Turn On When You Get Home – Part 1
Home Automation – Getting Your HTPC To Turn On When You Get Home – Part 2
Setting up Llama can be daunting. There are tons of things to do within this app, and we’re only scratching the surface when it comes to functionality.
So what exactly is Llama?
Llama uses phone masts to determine your location, so that you can change your ringer, vibrate and ringtones depending on where you are as well as the time of day. Llama provides you with sound profiles so you can quickly switch between quiet, loud, silent and normal sound settings. You can set your family, partner and children to ring even if your phone is set to silent! You can create events and home screen shortcuts to manage your sound profiles and more
We’re going to be using it to tell Remote Launcher to wake up our HTPC when we walk in the door.
You can go here to install Llama to your Android device.
Once that is installed, you will need to setup Llama to learn your ‘Home’ area/location. You need to be doing this from home so please keep that in mind. Llama takes note of the cell towers you connect to in certain areas, that’s how it knows there you are, we’re not going to be using GPS. This takes some fine tuning and ‘learning’ on Llama’s end, but after a few learning sessions it should be fine.
From Llama, click the Areas tab. From what I remember, you should have Home and Work pre-populated. If you don’t, press the + button in the bottom right, and add a new location named ‘Home’.

After you have created your location, you need to long press (press and hold) on your ‘home’ location.

Press ‘Start Leaning Area’
That will bring up the following window with the duration. Choose something like 10 or 15 minutes. This is because you connect/disconnect from cell towers. Chose the time, and take a walk around your home.

After that completes it will know which cell towers are near your home location. Like I mentioned before, you may need to do this once or twice more. What I did was the next day when I arrived home from work, I did a learning session for ’30 seconds’ in order to note any more cell towers I may be connected to that I wasn’t previously. If you’re ever at home and the Areas tab doesn’t have “Current” under Home and Home isn’t green, then do a learning sessions for 30 seconds.
Building our Wake On Lan Event
Alright, we’re in the home stretch. We’re going to be setting up our Event to send the WOL packet. I’ll outline what I have setup, which I can guarantee will be different from you. I have mine tailored to:
- When I get home
- My work schedule
- My wifi network name
Here is what our event will do in “pseudocode” or in plain English:
If it’s Monday, Tuesday, Wednesday, Thursday, or Friday, and we connect to the wireless network <WIFI> and it’s between X PM and Y PM delay for 2 minutes, then run the shortcut ‘Htpc’ every 1 minute.
Our event is quite long and it involves a few different pieces which is fun. Typically all my Llama events are things like: If I leave home, turn my ringer to full. Boring simple stuff. Note that things like “Between X PM and Y PM” are very specific to me. This is when I get home (normally) and it works for me. I excluded my wifi name and replaced it with <WIFI> as its easier to understand, you just insert your wifi name there.
Let’s get started on building our event. Click the Events tab, then in the bottom right click the plus icon.

Next we need to name our event. I’ve called mine “Arrive at home” but you can be more creative with yours. Make sure we have “Enabled” checked.

Next we need to click Advanced.. to bring up some advanced settings.
We now need to fill out the following.
Check Delay Event and then choose 1-2 minutes

Next we want to scroll down and choose Repeat Event, with a repeat interval of 1-2 minutes. Now, this means it will re-send the WOL packet every 1-2 minutes. This isn’t a problem. It is okay to send WOL packets when it’s already on. This will not affect your network in any way.

Now click back. From here we need to press the Add Condition button on the bottom.
Once you press Add Condition, the following will pop up. Press “AND (match all)”

After you press that, you will be taken to the following. Press Add Condition.

After you press Add Condition, click Day of the Week

After you have chosen Day of the Week, you need to select the days of the week you would like this activated on. I only need this Mon-Fri, so those are the days I chose. You may need to choose something else. Click OK

Now, you need to click Add Condition again. This time we will be choosing Wifi Network Connected from the menu.

After you click that, you will be asked to choose your wifi network. Choose it from the list. Click OK.

Now, again click Add Condition, and choose Time Between

That will bring up the following window. Choose an approximate window that you will be arriving home at. I have mine set to an hour window (5PM-6PM), and I usually get home around 5:15-5:20PM. Sometimes earlier, sometimes later, this is why I set myself an hour window. Click OK. Then click the back button.

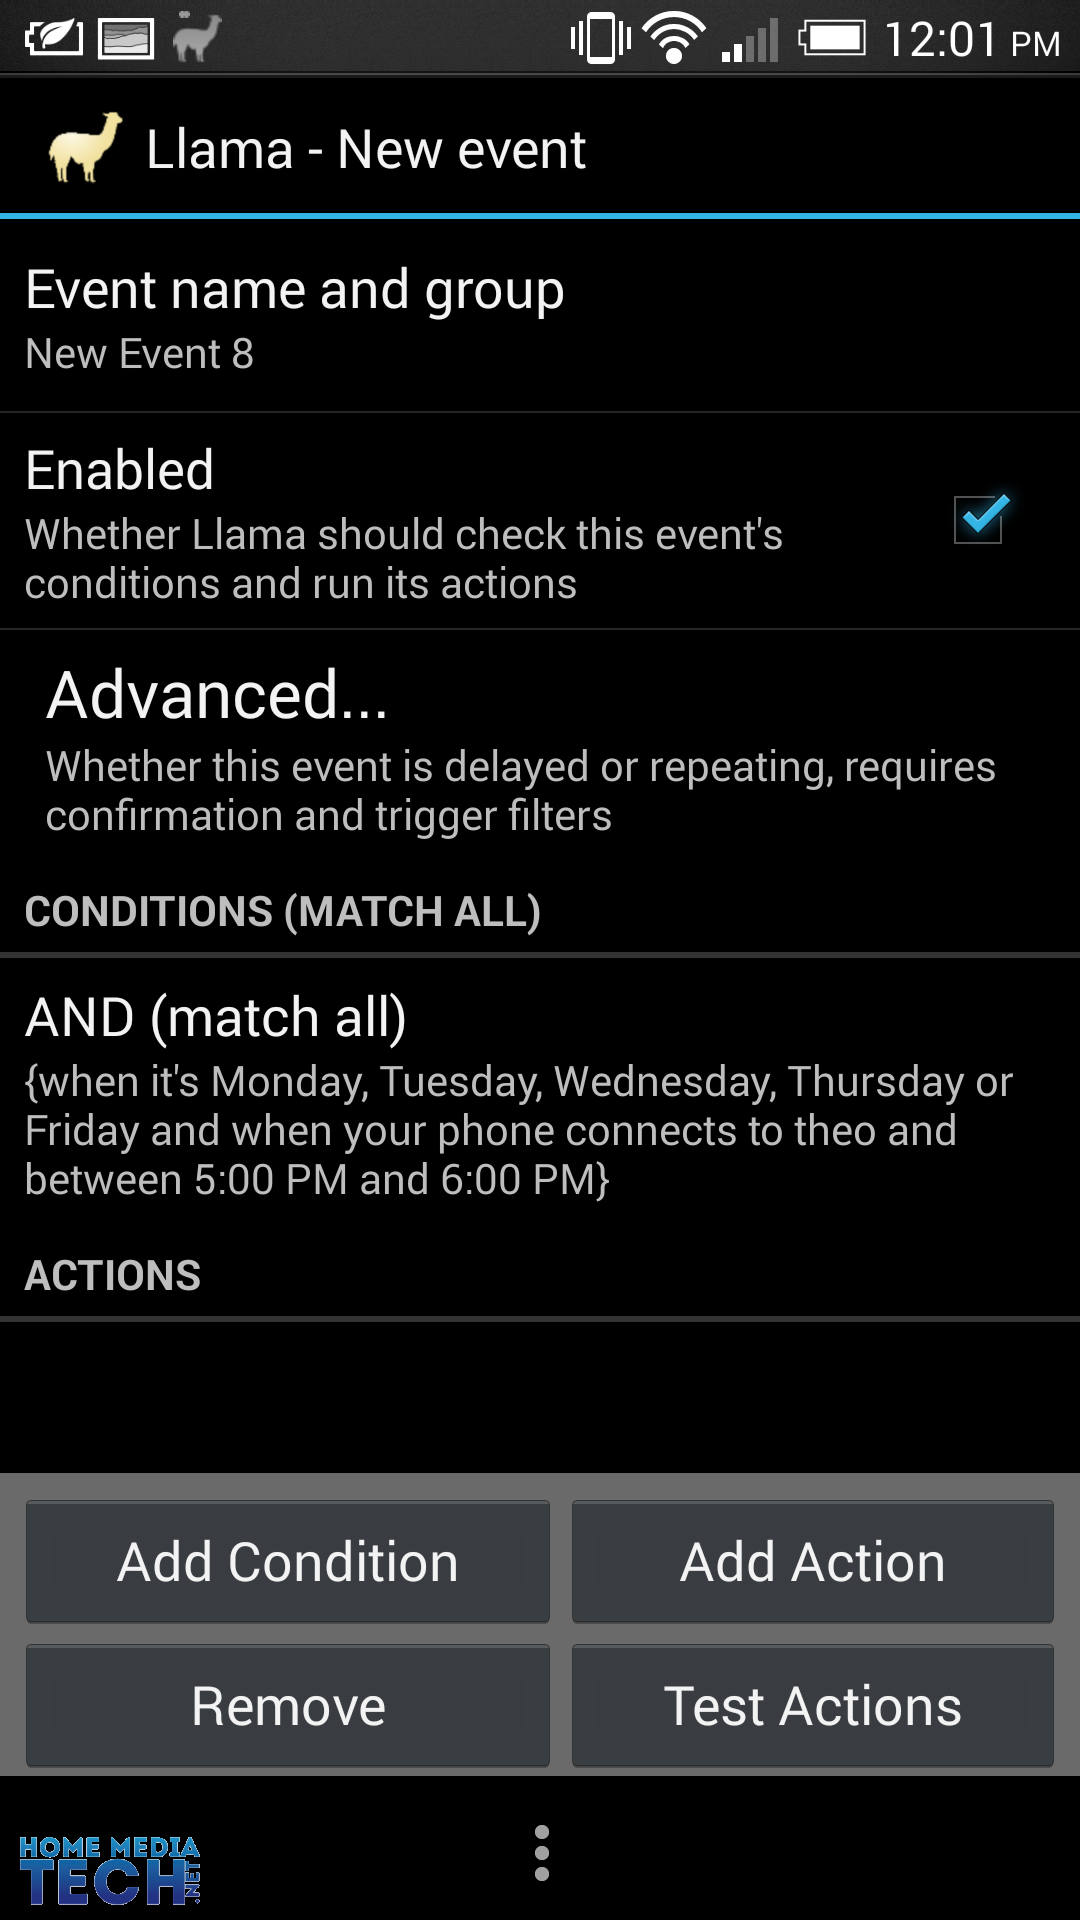
Your event should now look like this. Click Add Action at the bottom.
From that window we need to choose Run App Shortcut

Now, scroll down to Remote Launcher Free and choose that.

That should bring up a window like the following. Click Wake On Lan

Next, it will list the Htpc we added back in step 2. Click on Add Shortcut

Now, just press back until we get to the event details, it should look similar to this
Excellent! We’re done! From here you can choose Test Action but everything should be working.
You can play around with the time, so that you can test it in 5-10 minutes from the current time for example. This is what I did when I was setting it up. That’s the beauty of this setup is you can change something very quickly and easily by going in and changing a number. Try it out, test it, and come up with some that works for you.
I hope you’ve enjoyed following along. I had fun making this, and hopefully this will inspire you to get a little creative and setup other things using Llama or remote launcher.
If you have any questions please post below.
Thank you!
IPVanish, which is the only true Tier-1 VPN service in the world. IPVanish allows you to surf the net anonymously as well as access geo-blocked content in Kodi. You'll be able to watch anything unrestricted. They have clients for Windows, OS X, iOS and Android. OpenVPN is an option as well. Remember to use your IPVanish VPN with Kodi!


No Responses